")
")
.png "smartcubic (3)")
")
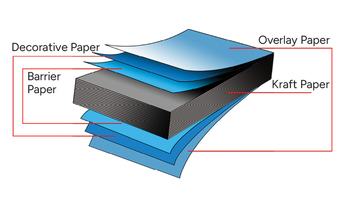
Smartcubic is a Grade A phenolic board for toilet cubicles, made with a High Pressure Laminate (HPL) and Compact Laminate (CL) structure with a thickness of 12.5 mm. It features a strong and solid construction with excellent resistance to water and moisture, along with high stability for long-term, heavy-duty use.
.png)

High-quality material designed for long-term use.

Withstands steam, hot water, chemicals, and high temperatures.

Suitable for various applications and adaptable to different design requirements.

Stain resistant, scratch resistant, and easy to clean.

Quick and easy installation with a complete system and accessories.

Tested for fire resistance, UV resistance, and antibacterial protection.


1. 1. Mark the position of the divider panels on the floor and wall.
1. 2. Mark the position of the pilaster panels on the floor and wall.

2. 1. Install the aluminum U-channel for the divider on the wall, then secure it using wall plugs (anchors) and screws until firmly fixed.

3. 1. Insert the divider panel into the aluminum U-channel. Provide support at the bottom to maintain stability, then secure the panel with screws.

4. 1. Install the aluminum U-channel on the back of the center pilaster and secure it with screws, then connect it to the divider panel.
4. 2 Use screws to connect the end pilaster panel and the divider panel using a butt joint method. After tightening the screws, install the aluminum L-profile (B) using sealant as an adhesive.
.")
5. 1. Install the support legs (pedestals) on the pilaster panel. After the position and height are aligned, slowly remove the support under the divider panel. Do not fix the pedestal yet to allow adjustment of position and height (A).

6. 1. Install the aluminum U-channel for the pilaster on the wall using wall plugs and screws.
6. 2. Insert the pilaster panel into the aluminum U-channel, then secure it with screws.
6. 3. Adjust the position and height of the pedestal, then fix it to the floor using wall plugs and screws.

7. 1. Install the aluminum head section on top of the pilaster panels and secure it with screws.
7. 2. Install the aluminum door jamb on the side of the pilaster panel and secure it with screws.

8. A. Recheck the spacing for the door panel according to the door leaf width.
8. B. Ensure all support legs (pedestals) are level. Once aligned, fix all pedestals to the floor using wall plugs and screws.

9. A. Install the door hinges on the pilaster panel, then tighten them securely with screws.

10. 1. Install the door panel between the two pilasters. Provide support at the bottom to align it properly, then secure the other side of the hinges to the door panel using screws.
10. 2. Install the indicator lock and tighten it securely with screws.

11. Install the coat hook on the inner side of the door and position the indicator lock on the door panel as required. Tighten all components securely to ensure a neat and firm installation.

 Bahasa
.png "Ekstrusi Aluminium - Head Rail")


.png "A2 - Kaki/Pedestal")


